To add heading elements or custom styles to the Umbraco richtext editor, you’ll need to create custom formats. Creating a new format is not exactly intuitive, but if you follow these instructions it’s a breeze.
In Umbraco Back Office:
- Click the
Settingsmenu item. - Hover over
Stylesheets. - Click the ellipsis and select
Create. - Name your stylesheet.
- Click
Create.
This stylesheet will serve as a container for the individual formats you will create. To create a format:
- Hover over the new stylesheet, click the ellipsis and select
Create. - Name your format descriptively, as this name will appear in the dropdown list in the editor.
- In the property menu that appears, rename the
Aliasproperty to the element or class name you want the format to insert into the editor. For example, if you want the format to transform the selection into anh1element, you enterh1in theAliasfield. If you want to insert a span element with a class name, you enter.class-name. - Enter the CSS you want applied to element or class in the
Stylesfield. - Click
Save. - View the
Previewfield to ensure your styles are correct
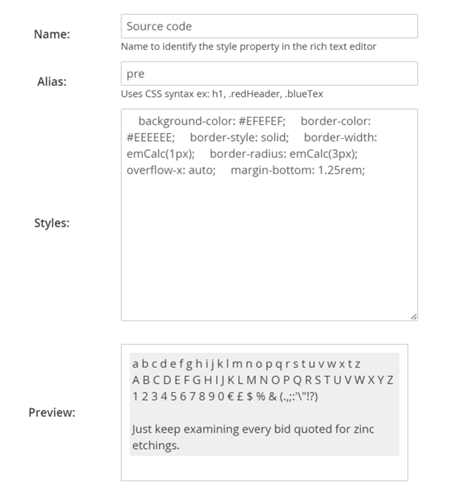
In the example below, I am entering styles for formatting source code. I use a pre element for this purpose. When I eventually go to the editor, Umbraco will wrap the text I highlight with the pre element and apply the CSS from the Styles field.

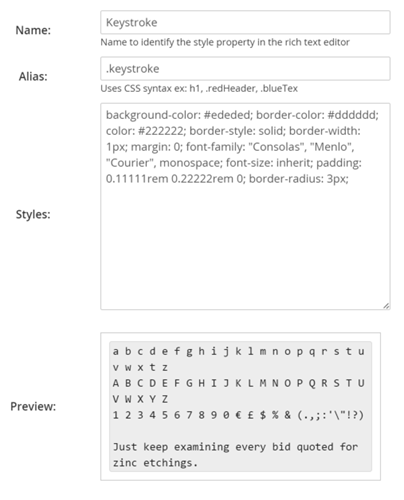
In the second example, I am applying styles to a class name. In the editor, Umbraco will insert a span element with the class name from the Alias field.

As an aside, you can also create custom formats without specifying anything in the Styles section to leverage existing classes in another stylesheet. The issue with this route is that you won’t have the ability to preview the styles within the editor as you type.
Next, we need to add the custom format collection to the richtext editor data type.
- On the main navigation menu, click the
Developermenu item. - Expand
Data Typesand selectRichtext editor. - Scroll to the
Stylesheetsproperty and select the stylesheet you created as your format container. - Click
Save.
You’re now ready to use your custom format!
Navigate to the Content section on the main menu and browse to a page with the richtext editor data type. Highlight the text you want to apply the format to and select the format from the Formats dropdown. Your format will appear instantly in the editor.